A panorama is usually an image with a large angle-of-view. Often, it has one side much longer than the other. There are different ways to create a panorama, depending on the equipment at hand and what we are trying to achieve:


Stitching images is not limited to creating wide-aspect-ratio or extreme-angle image. Although those are the most common uses of this technique, sometimes it is merely used to create an ultra-high-resolution image.
Making a panorama photo is generally a two-step process:
Two additional steps may be needed for more complex panoramas. One is to mask unwanted parts of images and remove geometric distortion before the stitching process. The other is to manipulate the output to remove issues left by the stitching software.
The goal of the image capture step is to gather image which a stitching program can use to assemble a seamless panorama. Stitching images together is an rather complex operation for software to do and many potential issues can prevent a proper panorama from being generated. The more care is taken during the capture step, the more chances there are that a seamless panorama can be produced.
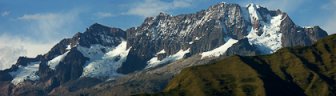
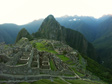
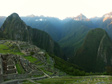
The most important rule is to make sure that images overlap for all adjacent edges. Look the three images on the left and the resulting panorama on the right. Notice how the right side of the first image has the same content as the left side of the second image. The right side of the second image also duplicates content from the left side of the third image.
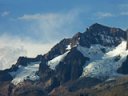
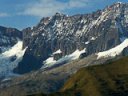
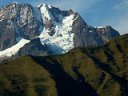
These overlap regions are use by panorama software to determine how to stitch images together. It is generally recommended to have between 20% and 30% overlap. More importantly, it is critical that overlap areas include fixed sharp distinct details. Therefore, issues will arise if:
In some cases, it may not be possible to avoid all of the above. Software features exist to deal with such cases but success cannot be guaranteed. Moving objects such as people and vehicles tend to be the most problematic and hardest to avoid.
The second rule for capturing images is to keep everything as constant as possible between shots. For a digital camera, all of the following should be kept fixed:
Note that if you shoot RAW files instead of JPEG images, then WB and image parameters have no effect. Then again, if this is the case, you probably do not fiddle with them anyway.
Nearly all digital cameras can be used to create a panorama but Panorama Assist, AE-L, or Manual-Controls features are needed to keep everything constant. Most fixed-lens cameras have a Panorama Assist mode while all DSLRs have manual controls and an AE-L button.
Panorama Assist is extremely useful. On a point-and-shoot camera, it is usually the only way to keep exposure constant across multiple images. This mode locks all the necessary settings and sometimes a few too many. It also provides a guide to align images, often as a semi-transparent slice of the previous shot taken. In addition to locking settings, Panorama Assist imposes some restrictions on panoramas. Particular restrictions depend on the camera model. The number of shots is typically limited between 3 and 26. The direction of successive shots may be limited to one or two ways. Presently, panoramas are limited to a single row of images.
Manual-Controls are the easiest way to ensure exposure does not change. The same thing can be done by keeping the AE-L button pressed throughout the sequence. On some cameras, the AE-L button can function as a toggle and may be released before capturing the images. The shutter-release's halfway point often triggers AE-L but may not do so across images.
A panorama is almost always created from images taken from the same viewpoint. For utmost exactitude, a special panoramic head or nodal-rail attached to a tripod is necessary While you can pull off a panorama without keeping the viewpoint 100% consistent, doing so causes stitching problems.
The goal of keeping the viewpoint constant is to capture images that are as consistent as possible. Any shift in position between frames may cause the relative distance of objects to change or worst, it may show differences in object overlap, which can produce images that are impossible to assemble. This problem is much more pronounced for close-by subjects.
Technically, the viewpoint which must be kept in place is the entrance-pupil of the lens. This is often referred to as the nodal point and is located somewhere within the lens. One must take time to find the entrance-pupil of a lens. The procedure is simple and is best accomplished on a tripod using an adjustment rail:


When taking photos to stitch into a panorama, it is ideal to rotate the camera around the entrance pupil. This means that if you are holding the camera, you should be moving around the lens, rather than rotating the camera around you. Even if you are not using a tripod and rail or special panoramic head, striving to keep the entrance pupil at the same position greatly helps.
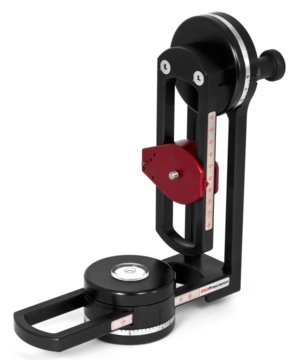 The ideal tool to rotate a camera around the entrance pupil of its lens is a panoramic head. Shown here is the 360Precision Adjust Giga. A head like this allows precise rotation horizontally and vertically for stitching multiple rows of images. It also adds 1.1kg or over 2lbs to your tripod.
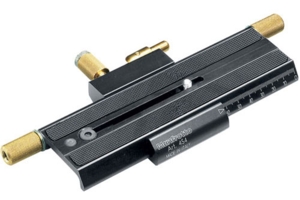
A lighter alternative is to use a rail. Most Rails are designed for macro photography, but can be used for panoramas using wide-angle to short-telephoto lenses. Below is the Manfrotto 454 Positioning Rail.
See the Panoramic Heads page for specific models of tripod heads suitable for panoramas. A tripod head must obviously be attached to a suitable tripod. In order to capture a level panorama, it is very important to keep the horizon at the same pitch while rotating the camera. If using a panoramic head or any type of head with independent panning movement, the key is to keep the top of the tripod level. Be careful, if the top of the tripod is not level, panning will change the pitch of the camera, even if it was level to begin with.
Every collapsible tripod can be made level by independently controlling the length of each leg. It is relatively easy to do this approximately but quite fiddly to do this with sufficient precision. At the very least a bubble-level on the base of the tripod should be used as a guide. A much better solution is to use a leveling base which goes between the tripod and head. A leveling base allows a panoramic head to be placed level even over a slanted tripod with little effort.
To get a perfect panorama without visible seams between images, the brightness of individual shots has to match around the stitch boundary. A consistent exposure is necessary for this yet is not always possible. Just like a shot should be exposed to avoid blowing highlights, so should a panorama.
To set exposure for a panorama, find the brightest part of the scene, point the camera at it and meter for that shot. If there is some latitude, meter as bright as possible without over-exposing. There are several ways to perform this:
It may not be possible to get every part of a panorama properly exposed. If the sun is to one side, this will usually be a huge problem. There are multiple solutions for this. One is to come back at a different time when the light produces more uniform illumination. The other is to create HDR imagesHDR Images are produced by combining multiple exposures into a single image. by bracketing each shot. For desperate times, one may adjust exposure between frames but this will create a lot more work during the stitching process.
After all images are captured they have to be stitched to form a panorama. For most circumstances, images can be processed as-is be the software. RAW files must be converted into a format understood by the panorama softwareCheck software documentation. When in doubt, use JPEG images saved at the highest quality. using exactly the same image parameters.
Modern panorama software make stitching images extremely easy. Using older software is possible but the process is very tedious and error-prone, so this tutorial only covers automatic stitching. As such, make sure you have a suitable stitcher before starting. See the Panorama Software Review box in the right column for a list of software reviewed here. If you have a Windows computer or a virtual machine to run Windows application, you can get started with the free Autostitch demo.
Autostitch is a wonderful invention for panoramic photography. The free demo is minimal but its core technology has been licensed to a number of companies who have created polished products with it. The steps to use Autostitch are:
Step 4 may take a few seconds, a few minutes or even hours, depending on the size of the panorama. If it runs out of memory, you can try again after increasing the allowed memory size using Edit->Options. The default for System Memory is 0.25 but it can be set to 0.75 or 0.9 even. If it still runs out of memory, then another stitching software is needed.
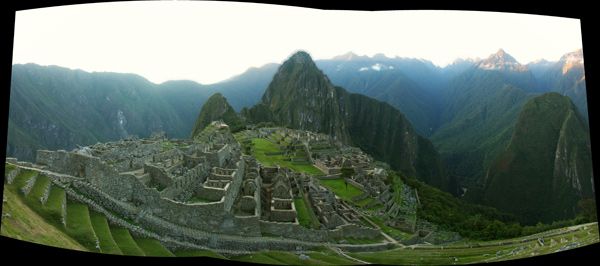
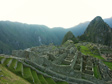
When step 4 has completed, use the image editing software to crop and straighten the panorama, if needed. Then save the results and there you have your panorama! Given the 3 small images above, Autostitch will produce the panorama on the right.
Autostitch technology is even more magical than this. To experience it, you need a commercial product. It can automatically find which images are part of a panorama and assemble a number of panoramic photos from one set of files.
With other automatic panorama software, the process is similar except with more options and opportunities for adjustments. The first step once the software is launched is to select a group of images. Then a button is pressed to detect panoramas and generate a low-resolution preview. If the preview looks right, then click on a button to render the panorama. An options dialog may appear to ask for the filename and output size among other parameters. If the preview needs adjusting, there is usually an Edit mode to change things including cropping, horizon straightening, projection changes and more. Exact options depend on the chosen software.
It is possible to get a perfect stitch without any user-intervention. However, stitching issues can easily crop up even with seemingly simple panoramas. Of course, the more complex the panorama in terms of subject and number of images, the more issues tend to appear.
Stitching issues fall into the input or output category. An input problem has to be corrected before the stitching process starts. An output problem can be corrected by changing parameters in the stitching software or using a photo manipulation tool such as Photoshop Elements.
Input issues, at worst, can be unfixable without re-shooting the panorama. However, some problems can be fixed. For a panorama that shows a chopped object, such as half-a-car, try to crop the input images to exclude it. Just remember to leave some overlap after cropping. You can also crop images with blurry and dark corners due to lens defects to avoid strange artifacts in the output. Cropping input images also speeds up the stitching process.
Output issues can occur when the panorama software incorrectly stitches images together. Advanced software often allows the user to set control points which match between pairs of images. Some software let the user mask out parts of images, so that they are not considered during the stitching process. This is useful to mask out moving objects such as people, tree leaves and clouds.
It is possible for a panorama to be stitched differently than desired. Depending on the software, it may be possible to adjust this by specifying the panorama center, projection type or other parameters. For circular panoramas covering 360°, manually choosing the center can result in a more visually pleasing panorama.
Finally, if the output shows anomalies, it is possible to correct them using photo manipulation software. Common anomalies include visible seams, bent objects and broken edges. It takes quite some skill and a lot of patience to fix these, so trying another software is an option too.
Panoramic photography is easier than ever thanks to automatic stitching software. The more careful you are, the best your chances of producing a clean panorama with little effort. Not every subject is well-suited for panoramic photography and motion causes the most problems but, when it works out, a panorama photo can be stunning!
For best results making a panorama photo, the following, plus a suitable subject, are required:
High quality panoramas are assembled by specialized image stitching software like the ones reviewed here. Stitching a panorama photo is very complex so the panorama software can make a huge difference.
All you really need is a capable digital camera and stitching software. There is plenty of photography gear that can greatly help make a panorama, with a tripod being most beneficial.
Check items below for recommended gear to make capturing panoramic photos much more enjoyable: